Showing posts with label Vegetables. Show all posts

Monday, October 16, 2017

Slice and Dice: Eggplant

By early October, I start to crave comfort foods from around the world. Eggplants come in an endless variety - from Biancas to Santanas to Pingtung Long - and offer a ticket across the globe. I bake them until succulent in parmesan, roast them until smoky for baba ghanoush, and saute them for the perfect meat substitute in Asian dishes. 

How to Select and Store Eggplant

Although eggplant is available year-round, its peak season is during the late summer and early fall. When selecting the right one, be sure to check that the skin is smooth and taut. If it’s ripe, gently (and affectionately) squeezing the flesh will leave a shallow, temporary indentation.


How to Peel, Slice, and Salt Eggplant

In the U.S., the voluptuous pear-shaped globe eggplant is the easiest to find. Its purple-black skin becomes chewy when cooked, so it’s often removed. Its springy, porous flesh sucks in oil, so to keep it from becoming greasy when cooked, eggplant is often salted, rinsed, and dried before cooking.

Place the eggplant on its side on a cutting board. Slice of the stem and the rounded end.


Using a vegetable peeler or pairing knife, remove the skin in long strips, moving lengthwise from the stem to bottom end. Or leave it on and skip to the next step.

Slice across the eggplant crosswise.


Place slices in a colander and sprinkle generously with salt -- enough to ensure each slice has been dusted. This keeps it from becoming spongy when cooked. Let the eggplant sit with the salt for about 15 minutes. (You will see water beads appear on the eggplant's surface.)

Rinse the salt from the eggplant and thoroughly dry it before cooking.

How to Cube Eggplant


Place the eggplant on its side on a cutting board, slice off the ends, and remove the skin with a vegetable peeler, as above.
Rest the bottom end of the eggplant on the cutting board. Cut down through the eggplant lengthwise, every half inch, to create planks.


Stack two planks on the cutting board and slice across them lengthwise, creating half-inch wide sticks.


Cut across the sticks, every half inch, to create half-inch cubes.


Advance purchase required!
Book your Chicago Food Tour today!
buy tickets at zerve
or call Zerve at (800) 979-3370

Thursday, August 31, 2017

Slice and Dice: Beets

"The lesson of the beet, then, is this: hold on to your divine blush, your innate rosy magic..." Tom Robbins
 
 From the outside, beets fail to leave a lasting impression. In fact, they range from dull to downright curmudgeonly. Who wants that, when you can opt for cheery tomatoes or regally robbed eggplants? Well, as many cooks know, it’s foolish to judge a root vegetable by its cover. Despite their drab exterior, beets possess a beguilingly sweet, earthy flavor. They bring a jewel-like beauty to the table (think garnets and coral) and plenty of substance, including folate and fiber. 

How to Select and Store Beets

Select firm beets with wrinkle-free skin. If you find them with their greens intact, look for vibrant, succulent leaves, and consider yourself lucky: the antioxidant-rich greens are edible so you're getting two-for-one. Use them as a fiber-rich filler in soups, omelets, and stir-fries. 

Beets can be stored in the refrigerator loose and unwashed for up to a week. Cut off the greens first, leaving an inch of the stem intact to keep their stain-inducing juice from leaking into your fridge. Store the greens in a breathable bag in the fridge for up to two days.

How to Steam Beets

If the beet greens are attached, cut them with an inch of the stem still intact.


Thoroughly wash the beets. 

Fill a large pot with a few inches of water. Place the beets in a steamer insert in the pot and cover.

Simmer the beets until they are easily pierced with a knife, about 40 minutes to an hour for medium-sized beets. The skin may appear to pull away slightly. If needed, add more water during the cooking process.


Remove from the pot from the stove and allow the beets to cool.

Beet juice will stain your fingers. Put on a pair of plastic gloves to keep your hand from getting dyed.

Gently rub off the skin with your fingers.


How to Slice Beets

Slice off the stems and root end of cooked beets.

Place the beet on the cutting board root-side down. Slice across it every half inch or at larger intervals for thicker slices.


Wash your cutting board immediately as beet juice stains.

How to Dice Beets


Slice off the stem and root ends of cooked beets. Place the beet on the cutting board root-side down. Slice across the beet at every half inch.

Stack two beet slices on the cutting board. Cut across them widthwise at every half inch. Rotate the batons 90 degrees and slice across them lengthwise every half inch. 


Advance purchase required!
Book your Chicago Food Tour today!
buy tickets at zerve
or call Zerve at (800) 979-3370

Sunday, October 16, 2016

Slice and Dice: Cabbage

Stir-fried cabbage
Hardy, affordable, and ever-giving, cabbage is a workhorse in the kitchen. It's packed with vitamin C goodness and makes a great culinary companion year round. Use these tips to add the cancer-fighting cruciferous to your home menu. 

How to Select and Store Cabbage

Select a cabbage that feels heavy for its size and has crisp, tightly packed leaves. Carefully examine the stem end. If it’s cracked, take a pass as it's a sure sign of aging. The snug-fitting layers loosen when chopped and yield much more than you might expect. Unless you need an ocean of cabbage, opt for heads that are small to medium sized. Cabbage can be stored in the refrigerator for up to two weeks. Be sure to keep it wrapped tightly in plastic.  
How to Core Cabbage

Remove the outer leaves.

Peel off outter leaves


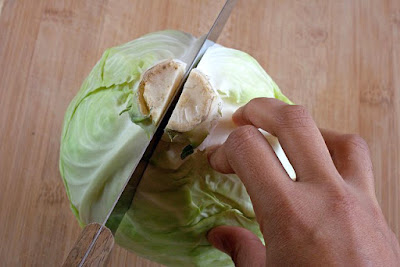
Place the cabbage on a cutting board with the stem side up. Using a chef’s knife, slice it in half, lengthwise through the stem end.

Slice in half down the middle

To remove the tough core, place each cabbage half on the cutting board face down, and cut in half (again, lengthwise through the core) to create four quarters total.

Cut into quarters

Place a quarter of the cabbage on the cutting board with the cut sides facing up. Slice out the core, cutting away from you. Repeat with remaining cabbage quarters.


Slice out core


How to Shred Cabbage

Place one of the cored cabbage wedges on a cutting board with one of the two cut sides facing down. Starting at one end, slice across it every 1/4 of an inch, width wise. Separate the cut strands by gently tossing them with your fingers. Repeat with remaining wedges.

Shredded cabbage


Place one of the cored cabbage wedges on a cutting board with one of the two cut sides facing down. Slice across the wedge in one-inch intervals lengthwise, holding the cabbage wedge together as you make each cut.

Slice across lengthwise


Rotate the wedge by 90 degrees and slice across it in one-inch interviews crosswise to create bite-sized pieces. Repeat with remaining wedges.


Rotate 90 degrees

Chop into chunks


Advance purchase required!
Book your Chicago Food Tour today!
buy tickets at zerve
or call Zerve at (800) 979-3370

Sunday, August 21, 2016

Slice and Dice: Tomatoes

Vine-ripened tomatoes
In Illinois, midsummer is ushered in with the flash of fireflies and the radioactive buzz of cicadas looking for love. Fuzzy-faced sunflowers tower over Queen Anne’s lace and Black-eyed Susans. In the kitchen, the spotlight shifts from sweet corn to vine-ripened tomatoes, which spruce up salads, top backyard burgers, and stud my mom's one-of-a-kind Tomato Rice

How to Select Tomatoes

Select tomatoes that are wrinkle-free and feel weighty in your palm. When given a gentle squeeze, the fruit should feel soft, but not squishy. Since ripe tomatoes have a relatively short shelf life, try to gobble them up as quickly as possible. If you end up with a surplus, store them at room temperature in a single layer. Avoid chilling them in the refrigerator as it makes their lush flesh grainy. 

How to Peel Tomatoes

Tomatoes must be peeled (and seeded) to  produce bisque and other silky, smooth dishes. It’s a simple process that can also be used to skin peaches and other stone fruit.

Hold the tomato with the bottom side facing up. With a sharp chef’s, paring, or serrated knife, cut an "x" in the skin. Repeat with the rest of the tomatoes.


Two slits cut into the bottom of a tomato
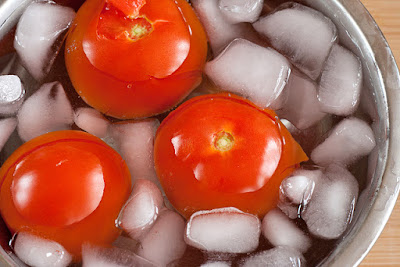
Fill a large bowl with water and ice and set it aside. 

Bring a large pot of water to a boil. Carefully lower each tomato into the boiling water, using tongs or a deep ladle. After 45 seconds, transfer each tomato to the ice water bath to stop the cooking.


Submerging tomatoes in an ice bath
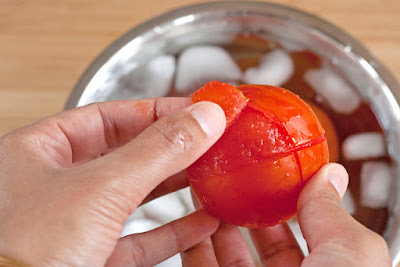
Peel away the skins, beginning at the cross of the "x."

Peeling back the skin at the "x"
How to Remove Seeds from Tomatoes

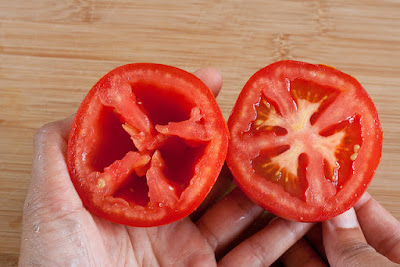
Slice the tomato (peeled or not) in half width wise. Hold one half of the tomato over a bowl. Use your thumb and index finger to gently force out the seeds.

If the seeds cling to the flesh, gently tap the tomato against the cutting board, cut side down. 


Halved tomato with seeds and without
How to Slice Tomatoes

The first step in slicing tomatoes is removing the core. Although it’s commonly done with a paring knife, I like the idea of removing it with a thin-edged measuring spoon as it’s a bit safer (making it a good job for kids).

Pierce and then encircle the flesh surrounding the stem end with a measuring spoon.


Scooping out stem end with a spoon_edited-1.jpg
Place the tomato on its side on a cutting board, and then slice across the tomato width wise.  

Slicing a tomato
How to Chop Tomatoes

Remove the stem end with a measuring spoon, as illustrated above. Place the tomato on its side on a cutting board and slice it in half.


Slicing a tomato in half
Place one half on the cutting board with the cut side down. Rest one hand on top of the tomato to hold it in place. With your other hand, hold the knife parallel to the cutting board and slice across the tomato.

Slicing across the tomato horizontally

Hold the knife perpendicular to the cutting board, and slice across the tomato.

Rotate the tomato 90 degrees. Hold the knife perpendicular to the cutting board and cut across the tomato again.


Slice into chunks


How to Prepare Tomatoes for Stuffing

Remove the core with a measuring spoon, as illustrated above. Place the tomato on its side on a cutting board and slice off the top quarter. Through the enlarged opening, carefully scoop out the ribs and seeds with a spoon.


Scooping out core


Tomato Rice

Advance purchase required!
Book your Chicago Food Tour today!
buy tickets at zerve
or call Zerve at (800) 979-3370

Sunday, November 15, 2015

Spiced Pumpkin Cupcakes with Cream Cheese Frosting

Cupcakes with icing   

When I was seven, I received a copy of Cricket’s Cookery from my Uncle Matthew. Inside the front cover, he penned the following directive in a curly-cued script that tangoed across the page:

“To Susan, help your Momie in need. Here is a good cookbook for you. Hope you will make some of the recipes.

Love,
Machayan
Christmas 1977”

Measure and mix together wet and dry ingredients

Cricket's Cookery turned out to be the perfect gift for a child enthralled by her mom's sorcery in the kitchen and eager to enter its fold. At a half inch thick, it was easier to hold than the culinary tomes that anchored our book shelf. Inside it offered recipes for Roly-Poly Pancakes, Mighty Meatballs, Yum-Yum Stew, and other silly sounding dishes. 

Cool baked cupcakes

The instructions for many of the recipes were meant to be sung out loud, a bonus for someone already apt to break into song. 

The Rainy Day Popcorn, for example, was to be prepared “…to the tune of Old MacDonald Had a Farm.” 

Its instructions begin like this:

“Put oil and corn into the pot.
E-I-E-I-O!
Cover pot and heat till hot.
E-I-E-I-O!
With a Pop! Pop! here and a Pop! Pop! there.
Here a Pop! There a Pop! Everywhere a Pop! Pop!”

For me, the underlying message was cooking could be loads of fun. 


Whip together frosting_edited-1

With my mom's help, I baked Oh, My Darling Sugar Cookies, Sugar Crumb Pies, Apple Doodle, and the other desserts, greasing pans and packing brown sugar along the way. I cracked open eggs and fished out shards of shells from whirly waves of butter, again and again.

Over time, I became the family baker and my mom focused on dishes prepared with palm fulls and pinches versus carefully measured ingredients. 

Garnish with candied pumpkin seeds

I have rolled out thousands of cookies and baked hundreds of cakes since unwrapping Cricket's Cookery's beneath a tinsel-laden tree. Its cover is bandaged with scotch tape and its back pages are wrinkled from water spills. Even so, it continues to be one of my most cherished culinary companions.

Spiced Pumpkin Cupcakes with Cream Cheese Frosting

Makes 12

If you're looking for a delicious holiday dessert, try making these moist, perfectly spiced little cakes! This recipe calls for many of the basic techniques I learned while cooking from Cricket's Cookery. Trader Joe’s carries candied pumpkin seeds, which add a lovely bit of crunch. If you can't track them down, use salted pumpkin seeds instead. 

INGREDIENTS

2 eggs
1 cup pumpkin puree
1/2 cup sunflower oil
1 teaspoon vanilla
1 cup flour
1 cup sugar
1 teaspoon baking soda
1/2 teaspoon salt
1 teaspoon cinnamon
3/4 teaspoon ground cardamom
1/2 teaspoon ground ginger
1/4 teaspoon ground cloves
1/4 cup butter
4 ounces cream cheese
2 cups powdered sugar
Candied pumpkin seeds

INSTRUCTIONS

Heat the oven to 350 degrees.

Place the eggs in the bowl of a standing mixer fitted with a paddle. Blend until eggs are fluffy. 

Add the pumpkin puree, oil, and vanilla. Blend until thoroughly combined.

Place the flour, sugar, baking soda, salt, cinnamon, cardamom, ginger, and cloves in a medium bowl.

Spoon half of the dry ingredients into the mixing bowl. Blend until just combined. Repeat with the remaining dry ingredients.

Fill 12 cupcake liners 3/4 way full. 

Bake for 15 to 20 minutes. Cool completely. 

Place 1 teaspoon vanilla, butter, cream cheese, and powdered sugar in a standing mixer and beat until fluffy. 

Frost cupcakes and top with candied pumpkin seeds.
Advance purchase required!
Book your Chicago Food Tour today!
buy tickets at zerve
or call Zerve at (800) 979-3370

Sunday, October 4, 2015

Slice and Dice: Onions

Purple, yellow, and white onions
Ever dependable, onions form the foundation of the soups, stir-fries, and South India fare that come out of my kitchen. Yellow onions acts as a full-flavored workhorse. Red onions add a splash of color, while white ones exude a bit of tang. Sweet onions are the mildest of the bunch and provide a pleasant punch in salads.

A tip before chopping: If you tend to tear up when prepping onions, refrigerate them for 30 minutes to reduce the amount of sulfur that’s released into the air. 

To remove the skin:

Cut off both ends of the onion.

Slice off end

Place either end on a cutting board and slice the onion in half. (This makes it easier to remove the skin.)

Slice onion down the middle

Pull off the skin. 

Peel onion

To slice:

Place one half of the onion face down on your cutting board. Place your hand over the stem end of the onion. Place your knife at a 45-degree angle at the root end of the onion and slice out the core.

Cutting out core

Place your hand at the root end of the onion to hold it in place. Curl in the tips of your fingers. Hold your knife perpendicular to the cutting board and make thin slices across the onion. 

Slice across

To roughly chop:

Place one half of the onion face down on your cutting board with the root end intact. With the root end facing away from you, place one hand on the side of the onion. With your other hand, hold the knife perpendicular to the cutting board and, starting at the end opposite your hand, slice three-fourths of the way into the onion towards the root end, leaving the root end intact. (This keeps the onion from falling apart.) Continue slicing across the onion, leaving a half inch or so between each incision. 

Slice across to roughly chop

Turn the onion 90 degrees and slice across the onion, again leaving about a half inch between each cut. This will produce roughly chopped pieces. 

Roughly chop

To dice: 

Place one half of the onion face down on your cutting board with the root end intact. Place one hand at the root end. With your other hand, hold the knife parallel to the cutting board and slice three-fourths of the way through the onion, leaving the root end intact. Continue slicing the onion with the knife parallel to the cutting board, moving up and away from the cutting board. Leave a quarter inch between each incision.

Slice through

Turn the onion 90 degrees so the root end faces away from you. Hold the knife perpendicular to the cutting board and slice three-fourths of the way into the onion, leaving the root end intact. Slice across the onion, leaving a quarter inch between each cut.

Slice perpendicular to cutting board

Rotate the onion 90 degrees. Again, hold the knife perpendicular to the cutting board and slice across the onion to produce small cubes.
Dice

You can use the same basic technique to prep shallots. Just swap out a paring knife for your chef’s knife and follow the steps outlined above.

This article was originally published on WholeFoodsMarketCooking.com
Advance purchase required!
Book your Chicago Food Tour today!
buy tickets at zerve
or call Zerve at (800) 979-3370