Showing posts with label Chocolate. Show all posts

Thursday, February 1, 2018

Frosting a Cake

Slice of frosted chocolate cake

“There's nothing better than cake but more cake.” Harry Truman

What is your favorite comfort food - the dish that makes your shoulders relax and your mouth water? For me, it's home-baked chocolate cake tucked under a supple layer of fudgy frosting. I've made many versions (including a double-decker, ganache-filled extravaganza topped with flowers sculpted from modeling chocolate for my sister's 40th birthday). When I show up for celebratory gatherings, family and friends assume I'll be toting cake.

The most important thing I’ve learned over the years is that no one expects perfection. In fact, they rarely seem to notice (or care) if a cake tilts or frosting gets smudged. The intoxicating flavor of homemade icing and cake makes them feel loved. Use the tips below to spread that warm fuzzy feeling. 


Basic Tools for Frosting Cakes

  • A serrated knife: Many cakes develop a domed top when baked, which should be removed before they are frosted. A serrated knife, such as a bread knife, is the best tool for the job as it easily slices through cake crumbs. 
  • Offset spatula: Although I try my best to get by with basic kitchen equipment, I believe a small offset is an essential tool for the avid baker. Use it to spread icing, custard, and other fillings on cakes and pastries.
  • Parchment paper or wax paper: You can use either of these products to keep trimmed cakes from spreading crumbs.
How to Frost a Cake


Make sure that the cake has cooled completely or your frosting will melt. 

Place the first layer of cake on a sheet of parchment paper or wax paper. Hold the knife horizontally against the cake where it starts to dome and carefully slice across the top to create a flat surface. Repeat with the other layers.


Slice dome off of layer of cake
Place the first layer of cake on a plate or cake stand with the bottom facing up. This helps to ensure that the top is completely flat.

Place cake on a cake stand or plate bottom side up
Tuck strips of parchment paper or wax paper between the cake and the plate to catch crumbs and bits of frosting.

Tuck parchment paper underneath cake
Gently remove any loose crumbs with your fingers or a pastry brush.

Remove loose crumbs with your fingers or a pastry brush
Place a dollop of frosting on the center of the cake.

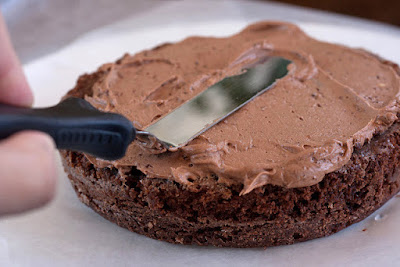
Using the offset spatula spread the frosting to cover the top of the cake.

Spread frosting evenly across the top of the cake
Place the second layer of cake on the first layer with the bottom facing up. Again, dust away any loose crumbs. 


Now it’s time to add the “crumb coat” which locks in any wayward crumbs. Place a scoop of frosting on the top layer of the cake.

Spread frosting across the top of the cake
Using the offset spatula, spread the frosting from the center of the cake to the top edges.

Spread icing on sides of cake
Chill the cake for 30 minutes in the refrigerator (or for 15 minutes in the freezer).


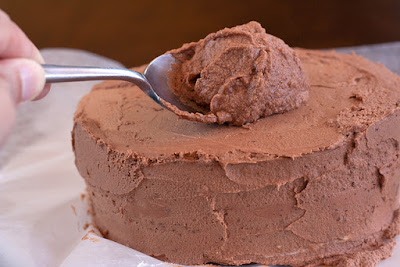
Remove the cake from the refrigerator. Place a generous scoop of frosting on top of the cake. Using the offset spatula spread the frosting across the top of the cake starting in the center.

Add layer of frosting over crumb coat


Spread the frosting on the sides of the cake to cover completely.


Spread frosting over crumb coat
Remove the strip of parchment paper or wax paper.  

This article was originally published on WholeFoodsMarketCooking.com 
Advance purchase required!
Book your Chicago Food Tour today!
buy tickets at zerve
or call Zerve at (800) 979-3370

Saturday, December 17, 2016

Making Ganache

Double chocolate pie
My Dad and I manage all of the grocery shopping during the holidays. It's a big relief for my mom who prefers to minimize all kitchen-related activities. The fact that Dad and I are bewitched by food, however, can pose a problem. Put us in a supermarket and we lose all sense of time.

Dad begins his meditation in the cheese aisle, where he carefully assesses the smoked gouda. After selecting only the best, he  reverently moves on to evaluate what's available in the realm of mixed nuts and wine. Should it be Merlot or Cabernet? Spain, Argentina, or California?

I head to my culinary playground - the baking aisle - where I ogle at local honey and sparkly sprinkles. I ponder all of the decadent desserts I can create with chocolate: airy mousse, toothsome brownies, lush ganache. Meanwhile, Mom is tapping her foot at home and wondering if we'll ever show up. Remember, her goal is to get in and out of the kitchen, lickety-split!


How to Make Ganache

Used to sculpt truffles, fill cakes, and blanket tarts, ganache is the home cook’s oh-so-easy-to-make secret weapon. It requires two ingredients: heavy cream and chocolate. Since the chocolate goes unmasked, be sure to buy the finest quality you can afford.

To make ganache that’s on the thinner side (and perfect to pour over tortes or spread over cakes in lieu of icing) start with an equal ratio of chocolate to heavy cream. To make ganache with a fudge-like consistency, use twice as much chocolate as heavy cream.


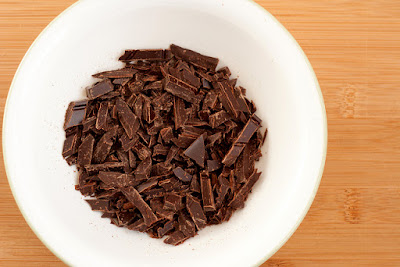
Finely chop the chocolate with a chef’s knife.  


Finely chopped chocolate
Place the chocolate in a heatproof bowl. 


Place chocolate in a heat-proof bowl
Pour the cream into a saucepan. Bring it to a boil, and then quickly remove it from the heat to help stop the water in the cream from evaporating

Pour cream in a pot and bring to a boil
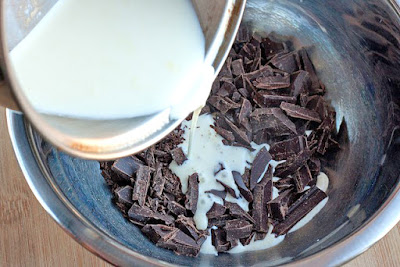
Carefully pour the hot cream over the chopped chocolate. Let it stand for a minute. The chocolate will start to melt. 


Pour cream over chopped chocolate
Stir the chocolate and cream, beginning in the middle of the bowl. After several minutes, it will start to emulsify and silky, smooth ganache will appear in the middle of the bowl. 


Stir beginning in the middle of the bowl
Continue to stir
Stir in wider circles to blend the rest of the chocolate and the cream.


Continue to stir
Continue stirring until the chocolate and cream are completely combined.


Mix until completely blended
This article was originally published on WholeFoodsMarketCooking.com


Advance purchase required!
Book your Chicago Food Tour today!
buy tickets at zerve
or call Zerve at (800) 979-3370

Friday, February 12, 2016

Melting Chcolate

Melted chocolate next to smores brownies


A few years ago, I picked up a part-time job with a chocolatier. On my first day in the kitchen, she invited me to eat as much chocolate as I wanted.

After a month, it became that clear that I would never tire of it, even after hand-dipping hundreds of truffles a day. (I adore the silky texture and complex flavor of chocolate, which spans a wide and luscious spectrum. I appreciate how it adds both refinement and comfort to desserts. Who can resist a fudgy brownie, a mug of cocoa, or a slice of old fashioned chocolate cake?) In fact, with each dip, dunk, and drizzle my passion only grew. 

What I learned from that experience and my culinary training is that melting chocolate can be tricky. It burns easily and "seizes," becoming stiff and gritty (or "seizes") if mixed with even a drop of water. 

Here are my tips for taking on that ultimately rewarding task!

How to Melt Chocolate on the Stove Top

Chocolate can be melted on the stove or in the microwave. I prefer to use the stove top method so let's start there. 
 
You will need a sharp knife, a cutting board, a heat proof bowl, a saucepan (to create a makeshift double boiler), and a spoon. The bowl should be bone dry and fit snugly over the saucepan to keep steam from escaping and settling on the chocolate. 

Place a bar of chocolate on the cutting board and, starting at one corner, finely chop it.

Finely chopping chocolate
Carefully slide the chopped chocolate into the heat proof bowl with the back of your knife and place it over the saucepan.

Chopped chcolate in a heat-proof bowl

Fill the saucepan with an inch or so of water. Make sure the water does not touch the bottom of the bowl when you place it on top as the chocolate should be melted by the steam that rises from the water. Bring the water to a gentle simmer on medium-low heat.

Stir the chocolate with a spoon to ensure even melting. 

Remove the melted chocolate from the heat while there are still a few small chunks of chocolate left in the bowl. 

Stir it until the chunks of chocolate have melted from the residual heat. 


Mixing melted chocolate with a wooden spoon

How to Melt Chocolate in the Microwave

To microwave chocolate, place the chopped chocolate in a microwave safe bowl. 

Chopped chocolate in a microwaveable bowl
Heat the chocolate in the microwave in short increments (15 to 30 seconds). The smaller the amount of chocolate you are melting, the shorter the intervals should be.

Remove the chocolate from the microwave and stir it to ensure even melting. 

Stirring chunks of melted chocolate
Continue to heat and stir the chocolate until there are only a few small chunks of chocolate left. Then stir it to melt the chocolate completely.   

This article was originally published on WholeFoodsMarketCooking.com
Advance purchase required!
Book your Chicago Food Tour today!
buy tickets at zerve
or call Zerve at (800) 979-3370

Friday, August 16, 2013

Siddo's Cake


In June, I got a call from my nephew Siddo who lives in Seattle and was on the cusp of turning eight.

“Susie Auntie, can you make my birthday cake?”

He was scheduled to be in Illinois with the rest of the family to celebrate my parents' 50th wedding anniversary.

“Of course, Siddo. What kind of cake do you want?”

“I’d like it to be square.”

“Ok, but what flavor should it be? Chocolate, vanilla, strawberry?”

“Chocolate.”

We continued to work out the details in conversations that followed.

“Susie Auntie, I know what I want on my cake. It’s something very old and something that you can use to buy things.”

A riddle. I liked the challenge.

Before I could respond, Sidd began again.

“Think about it, Susie Auntie. Do you need a clue?”

“Siddo, do you want it to have a dinosaur?”

“Yes! You’re right! Now try to guess the other thing?”

“Could it be money?”

“Yes, money!”

In the last few years, Sidd has developed a fascination with money that no one wants to claim.

With our creative juices flowing, Sidd and I discussed the possibility of frosting a sheet cake with green trimming to resemble a dollar bill and replacing Jefferson's profile with the side view of a dinosaur. But after more thought, we decided to make a cake with a giganotosaurus counting money. It would be cooler.


Advance purchase required!
Book your Chicago Food Tour today!
buy tickets at zerve
or call Zerve at (800) 979-3370