Showing posts with label Kitchen Basics. Show all posts

Thursday, April 11, 2019

Prepping Shrimp

Shrimp over rice pilaf

Chicago is miles away from the ocean. And although I love its magnificent architecture and fun-loving folk, sometimes I long for the briny breath of the sea. On occasion, I travel to the coast or go abroad to reach its salty waters, but more often, I look for simple ways to bring its flavorful bounty into the kitchen.

I enjoy feasting on an array of seafood: crab, scallops, lobster, squid, or clams. But in the Windy City, shrimp is often the easiest to find. I love to sauté it with cayenne, black pepper, and chunks of coconut, but it’s just as easy to deep fry, boil, or barbecue the quick-cooking crustacean. During Lent, dishes like this Kerala Fried Shrimp make meatless meals a small sacrifice.  


How to Select Shrimp


When you smell raw shrimp, it should remind you of a stroll by the sea. If it hints of ammonia, it's spoiled - walk away. Look for shells that are clean, shiny, and free of spots. If possible, opt for whole shrimp, which has more flavor and spring texturally than its shelled and deveined counterpart. Whole shrimp is surprisingly easy to prep using the tips below.


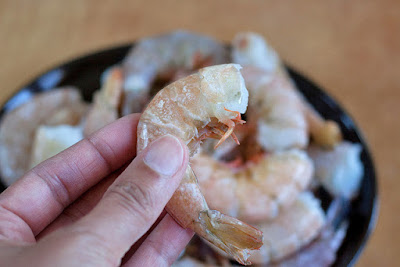
Whole shrimp with shell

How to Peel Shrimp


Shrimp is most often sold with the head removed. The translucent shell and, in most cases legs, are left intact. Although there are many ways to peel shrimp, I like to noodle my fingers just underneath the opening of the shell and carefully pull it away from the flesh as if I’m removing a tight-fitting life jacket.


Removing shrimp shell
I also run my finger under the tail shell and gently lift it off to keep the flesh just beneath intact.


Peeled and unpeeled shrimp

How to Devein Shrimp


A shrimp's intestine looks like a dark vein, which runs along its back. Since the intestine can have a gritty texture and an off-putting flavor, it’s best to remove it using a process called "deveining."Here's how you do it...Place the shrimp on a cutting board with the tail closest to you. With a paring knife, make a shallow slit along the curve of the shrimp’s stomach.

Slit the back of the shrimp with a pairing knife
Pull out the intestine with the tip of the knife and discard. 

Carefully remove the vein from the shrimp


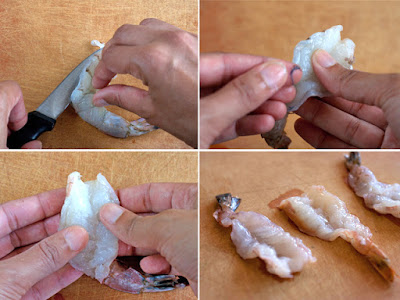
How to Butterfly Shrimp


Place the peeled shrimp (with the tail shell intact) on a cutting board with the tail closest to you.
With a paring knife, make a deep cut along the curve of the shrimp’s stomach, nearly dividing it in two. 


4 steps to butterfly shrimp
Remove the intestine with your fingers or the tip of the knife. Gently pull the shrimp open so the flesh lays flat.

Advance purchase required!
Book your Chicago Food Tour today!
buy tickets at zerve
or call Zerve at (800) 979-3370

Saturday, February 9, 2019

Making Roux


Calgon, take me away... to a sun-drenched island so I can ditch my down-laden, puffy coat.

Anyone else with me?

Sadly, I know I won't be trading in my laptop for a beach towel any time soon. So, I've turned to my kitchen to counter my winter blues and pulled out the ingredients I need for roux. 

Roux is a simple thickener that's integral to French cuisine and underpins many classic soups and sauces. It's the base for tuna casserole, mac and cheese, and other traditional American casseroles. Darker shades of roux (including brown and chocolate), bring depth and flavor to gumbo, étouffée, and other Creole and Cajun classics. Yum. Let's say it together, "Fat Tuesday!" 

It's easy to prepare, requiring just a saucepan and whisk. The general rule is to start with equal parts flour to fat, but the proportions can vary. French recipes for roux commonly call for clarified butter, while Cajun or Creole recipes incorporate butter, oil, or lard. Dark shades of roux, which are cooked the longest, contribute the strongest flavors to a dish. 

How to Make Roux

Note: I’m using butter and flour to prepare a blond roux for mac and cheese. You can cook the roux for more or less time, depending on the dish.

Melt the butter in a saucepan over medium heat.

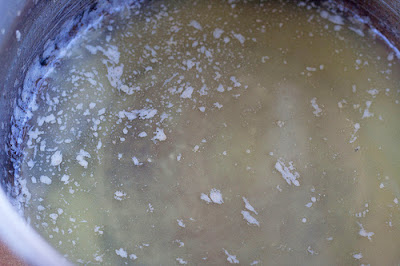
Butter melted in a pot
Add a smidgen of flour to the butter.


Add flour to the melted butter
When the mixture begins to froth around the edges, add the rest of the flour. Whisk the ingredients together to form a paste.

Whisk together butter and flour
To produce a white roux, continue to whisk until the paste thins and the yellow hue from the butter disappears. The paste should look pale. This will only take a few minutes.

To produce a blond (or golden) roux, continue to whisk over medium heat until the flour begins to caramelize and the roux turns tan.


Continue to whisk butter and flour

To produce a brown roux, continue to whisk over medium heat until it takes on the color of peanut butter.


Cook until roux looks like peanut butter
Continue cooking beyond that, and you're in dark-roux territory, with dark brown roux ("red roux") next up, and even darker "chocolate" roux last in line.
Advance purchase required!
Book your Chicago Food Tour today!
buy tickets at zerve
or call Zerve at (800) 979-3370

Tuesday, January 15, 2019

How to Roast Garlic in the Oven

Oven roasted garlic in a brown bowl
"The are many miracles in the world to be celebrated and, for me, garlic is the most deserving." Leo Buscaglia

I adore onions and covet ginger, but nothing makes me swoon like the sonnet-worthy flavor of garlic. How do I love garlic? Please, allow me to count the ways...I love it raw with a pungent presence and crisp bite. I love it sauteed so it's mellowed, but still spunky. I love it roasted until it becomes sweet and savory and as spreadable as jam. 

When the ground is blanketed with snow, I recommend roasting garlic. The tender cloves provides a lingering warmth and the cooking process will infuse your kitchen with an aroma that comforts like a cozy, woolen blanket. 

Fire-breathe-free roast garlic is also the best option for date night (as are caramelized onions). You want to woo your spouse/partner/potential lover not cause him/her to run away. Far away, right? As garlic lovers know, "A nickel will get you on the subway, but (fresh) garlic will get you a seat."

Roasting  garlic in the oven couldn't be simpler. So if you're looking for a way to warm your heart and your house this fall, I'm here to lead the way...

How to Roast Garlic in the Oven
 

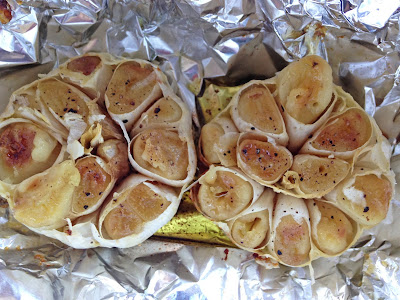
Preheat the oven to 400 degrees. Line an ovenproof dish with enough foil that it hangs over the sides. (When the time comes, you'll be able to seal the garlic in a tent). 

Garlic cloves with loose skin removed
Peel away any loose skin from the bulbs. 

Hold each bulb on its side and slice 1/4 to 1/2 inch off the top so the tip of each clove is trimmed. 

Place the bulbs in the foil-lined dish with their cut side facing up. 

Trimmed garlic bulbs coated with olive olive and seasoned with salt and peppe
Coat the trimmed cloves with olive oil to keep the garlic from burning. Season with salt and pepper.

Gather the ends of the foil and fold them together to seal in the bulbs.

Cook until the garlic becomes tender, about 45 minutes for medium-sized bulbs. 

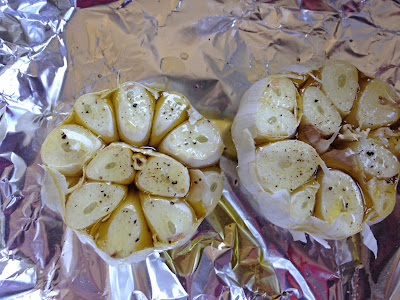
Two bulbs of oven-roasted garlic
Remove from oven and allow to cool completely. 

Gently peel away the outer skin. Squeeze the skin of each clove from the bottom (like a tube of toothpaste) to push out the flesh. 

How to Store Oven-Roasted Garlic


Place the cloves in an airtight container. Pour in enough olive oil to cover the cloves completely. Store in the refrigerator for up to a week. 

20 Ways to Use Roasted Garlic

Are you wondering how to use roasted garlic? Friends, the possibilities are endless. Here are 20 suggestions to get your culinary juices flowing:
  • Bake it into bread (like seen above)
  • Stir it into savory oatmeal
  • Spread it on warm toast
  • Substitute it for mayonnaise on sandwiches
  • Plop it on baked potatoes
  • Layer it on breakfast biscuits
  • Puree it into hummus
  • Beat it with butter 
  • Whip it with cream cheese
  • Smear it on crackers
  • Add it to salad dressing
  • Mix it into veggie dip
  • Puree it with tomato soup
  • Dollop it onto chili
  • Spread in on pizza dough
  • Add it to mac and cheese
  • Stir it into soup
  • Spread it on soft taco shells
  • Blend into a green smoothie
  • Mix it with warm pasta

Advance purchase required!
Book your Chicago Food Tour today!
buy tickets at zerve
or call Zerve at (800) 979-3370

Monday, December 4, 2017

Tying Pork Loin

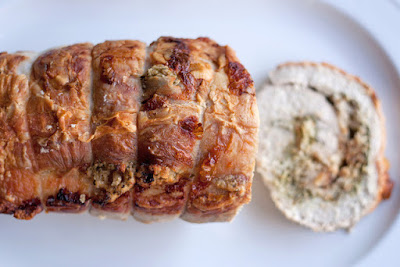
I can do without the frenzied shopping that threatens to swallow up Christmas, but please don’t take away the home cooking it inspires. Nothing compares to misshapen cookies enveloped with love or quick-breads haloed with spice. A mug of hot chocolate prepped by a friend will warm me up faster than a pair of fancy wool gloves. And sitting down to a carefully roasted lamb or pork roast? That may bring on cartwheels!

As it turns out, roasting meat doesn’t really require much skill. The trickiest part is tying it with butcher's string, which helps it cook evenly. Tying a roast also makes it shapelier and prevents the filling from slipping out, when stuffed. Here's how to pull it off...

How to Tie a Roast
Place the roast on a cutting board with an end facing you (as opposed to having the ends facing left and right).

Hold a long length of string in both hands, gripping an end with one hand. Slide the string under the roast until it is an inch and a half from the end closest to you.

Tie a simple knot around the roast, leaving an inch and a half of string on the short end. 

Slide the string up the roast by an inch and a half and hold it in place with your thumb.

Loop the rest of the string under the roast, creating a right angle in the string under your thumb.

Loop the end of the string under the right angle and pull to tighten it.
 

Repeat steps 4 to 6 to create a simple net all the way up the roast.
When you reach the end, lead the string down and over the end of the roast and turn it over.

Lead the string down, through the middle of the roast, pulling it over and under each piece of string already hugging the roast width wise.
 
When you reach the end of the roast, slide the string over the end and flip it over. Tie the string to the short end that you left protruding from the knot you tied first.

Roast away!
Advance purchase required!
Book your Chicago Food Tour today!
buy tickets at zerve
or call Zerve at (800) 979-3370

Thursday, July 20, 2017

Caramelizing Onions

Before I met my husband, Chris, I tried my luck with online dating, which ran the gamut from dismaying to disastrous. Sound familiar anyone?

There was the guy who besmirched all Indians even though he knew my ethnic roots. During our shared meal, the waitress kept giving me “you outta ditch him” looks. Then there was the guy who unwittingly emailed me after dating my sister for several months. Guess he had a type.

There was also the guy with the seemingly promising profile (challenging job, close-knit family, big blue eyes) until I reached his list of likes/dislikes. He despised onions and didn't want them cooked in his house.

I know that relationships require compromise, but I eat onions every day. Could I really forgo the zing of red onions in salsa or three bean salad? Wouldn’t I miss the smoky undertow of yellow onions roasted with potatoes, carrots, or squash? And what about the silky, sweet touch of caramelized onions slathered on burgers, sandwiches, and pizza crust?

In the end, I decided giving up onions was too great a sacrifice and I kept looking for the one.

Did I mention that Chris loves onions? In fact, I have to ask him to dial back the mound he that mixes into guacamole and the hill that he layers onto salad. It leads to onion breath and occasional indigestion.

But that seems like a small sacrifice for Mr. Right. 

How to Caramelize Onions

Caramelizing onions is surprisingly simple. It involves cooking away the moisture hidden in each layer of an onion and browning the sugar that is left behind. The process requires patience more than anything else. Resist the temptation to speed things up by cooking the onions over high heat or adding sugar. (Chances are you’ll end up burning them.) Also opt for white, yellow, or red onions but not sweet as they become cloying when their flavors are concentrated.


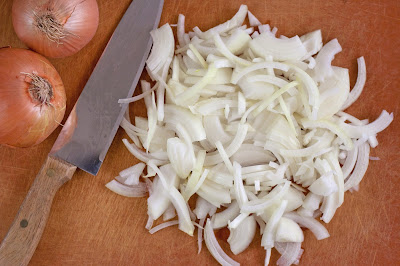
To make about 1 to 1 1/2 cups of caramelized onions, thinly slice 2 large onions.


Thinly sliced onions


In a large skillet, heat 1 1/2 tablespoons of olive oil over medium heat.


Heat olive oil


Add the onions and stir to coat them with oil. Season the onions with salt and pepper. Stir the onions every 2 to 3 minutes until they begin to look glassy.

Lower the heat to medium low and increase the frequency of stirring from every few minutes to every minute as they become stickier, turn light brown, and begin to lose their shape. This will take 20 to 30 minutes, depending on your stove top. 


Stages of caramelization
If the onions stick to the bottom of the pan, add a splash of water and scrap them off. This technique is known as "deglazing." Only do this if the onions are sticking so much that you can't loosen them without water -- some sticking is good as it's the contact with the pan that helps to create the color. You can always add more water if necessary, but adding too much will delay the process as the onions will begin to steam.

Continue to cook the onions, stirring frequently, until they become golden brown.


Advance purchase required!
Book your Chicago Food Tour today!
buy tickets at zerve
or call Zerve at (800) 979-3370

Saturday, June 17, 2017

Slice and Dice: Portobellos

Slice off the stem of the mushroom


I used to get a lot of flak for serving meatless meals, having descended from a line of devoted carnivores. The men, in particular, crave dishes with both heft and flavor. Because they are dense and filling, portobello mushrooms seem to satisfy even the pickiest eaters in the family. So, if you’re trying to adopt a healthier lifestyle and/or a greener footprint, be sure to pick up some portobellos.

How to Select Portobello Mushrooms

What do you get when a crimini mushroom (or baby bella) grows up? A portobello with chocolate-colored gills and a woody stem. Select the ones that are plump and smooth-skinned, with a delicate, earthy aroma.

How to Clean Portobello Mushrooms

Using a paring knife, slice off the stem. If it has the texture of a wine cork, throw it out or save it for making stock. If it is tender, rinse it and slice it into pieces length wise. 

Remove the gills using the tip of a spoon to scrape them away.

Scoop out gills with a spoon

Wipe the mushroom cap with a damp cloth or paper towel to remove dirt without soaking it in water.

How to Slice Portobello Mushrooms

Place the cleaned mushroom on a cutting board stem-side down. With a chef’s knife, cut the mushroom in half.

Slice the mushroom cap in half

Rotate each half so the flat, just-cut end is parallel to you, and slice across it width wise into 1/2-inch lengths (or thinner if desired).

Slice portobello width wise


How to Chop Portobello Mushrooms

Repeat steps above for slicing. Rotate the sliced pieces 90 degrees and cut across them width wise to make 1/2-inch cubes (or smaller if desired).

Slice into cubes

Advance purchase required!
Book your Chicago Food Tour today!
buy tickets at zerve
or call Zerve at (800) 979-3370

Saturday, May 6, 2017

Slice and Dice: Avocados

My apartment in Japan was tiny, but I figured I could squeeze two other teachers around my bento table for a meal. It would start with chips and guacamole, which where I come from, calls for bottled lemon juice and a few plops of mayonnaise. Over my lunch break, I flagged down a clerk at Isetan department store and asked for lemon juice with the cadence of a cave man. She smiled politely, bowed briskly, and sped off in the direction of the cooler as I followed in hot pursuit. She handed me a bottle of chilled juice and then bowed again. I replied with “Domo arigato” and teetered in her direction. Then I asked for may-oh-naise. The clerk broke into a broad smile, and replied, “My name? My name is Akiko!” Humored, I left without mayonnaise, which I later realized was a good thing. Who needs mayo when you've got fresh avocados?
 
As luscious as butter and as subtle as white chocolate, avocados add creamy comfort to many a dish. Their bumpy, alligator-like skin hides melt-in-your mouth yellow-green flesh. Here are some tips to use, whether you’re shopping for a batch of rippled, purple-skinned Haas, thin-skinned Fuerte, or another variety.

How to Select Avocados

Avocados only ripen after they have been harvested. To test whether an avocado is ready to eat, give it a gentle squeeze and look for a shallow imprint in the skin. If the flesh is as hard as a bowling ball, it will need time to mature. If you feel the flesh collapses under the skin, the fruit is past its prime.

How to Store Avocados

Ripe avocados can be stored in the refrigerator for two to three days. Once cut, be sure to sprinkle them with lemon juice, lime juice, or another acid to keep them from turning brown (or "oxidizing"). Unripe avocados should be kept at room temperature until they ripen. To hasten the ripening process, place the fruit in a paper bag with an apple or a banana.

To freeze: If, through great fortune, you end up with more avocados than you can use, consider freezing them. Use the steps below to pit and mash the fruit. Then sprinkle it with lemon juice, lime juice, or another acid to keep it from browning. Place it in an airtight container or freezer-safe bag before freezing it.

How to Prepare Avocados

To pit: Thoroughly wash and dry the avocado. Place it on a cutting board lengthwise. Hold a chef’s knife parallel to the cutting board. Starting at one pole, slice into the fruit. Rotate the fruit and continue to slice it along the equator.


Hold the avocado with both hands and twist in opposite directions. 

Carefully insert a spoon under the pit and lift it out. 


To slice: Place half of the avocado on a cutting board with the cut side down. With a chef’s knife, cut it down the middle lengthwise. 

Carefully pull off the skin. 

Place the fruit on the cutting board and slice it lengthwise or width wise.

To dice: Hold half of an avocado with one hand, flesh side up. With a butter knife, cut the flesh into half-inch strips lengthwise. Cut the flesh into half-inch strips width wise.


To mash: Scoop out the flesh from a pitted and diced avocado with a spoon and place it in a bowl. Then mash it with a fork.


Advance purchase required!
Book your Chicago Food Tour today!
buy tickets at zerve
or call Zerve at (800) 979-3370