Monday, December 4, 2017

Tying Pork Loin

I can do without the frenzied shopping that threatens to swallow up Christmas, but please don’t take away the home cooking it inspires. Nothing compares to misshapen cookies enveloped with love or quick-breads haloed with spice. A mug of hot chocolate prepped by a friend will warm me up faster than a pair of fancy wool gloves. And sitting down to a carefully roasted lamb or pork roast? That may bring on cartwheels!

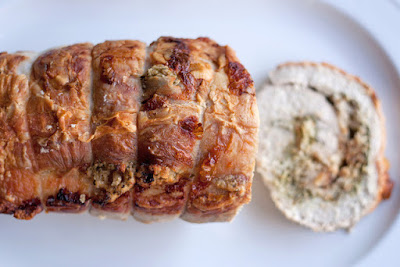
As it turns out, roasting meat doesn’t really require much skill. The trickiest part is tying it with butcher's string, which helps it cook evenly. Tying a roast also makes it shapelier and prevents the filling from slipping out, when stuffed. Here's how to pull it off...

How to Tie a Roast
Place the roast on a cutting board with an end facing you (as opposed to having the ends facing left and right).

Hold a long length of string in both hands, gripping an end with one hand. Slide the string under the roast until it is an inch and a half from the end closest to you.

Tie a simple knot around the roast, leaving an inch and a half of string on the short end. 

Slide the string up the roast by an inch and a half and hold it in place with your thumb.

Loop the rest of the string under the roast, creating a right angle in the string under your thumb.

Loop the end of the string under the right angle and pull to tighten it.
 

Repeat steps 4 to 6 to create a simple net all the way up the roast.
When you reach the end, lead the string down and over the end of the roast and turn it over.

Lead the string down, through the middle of the roast, pulling it over and under each piece of string already hugging the roast width wise.
 
When you reach the end of the roast, slide the string over the end and flip it over. Tie the string to the short end that you left protruding from the knot you tied first.

Roast away!
Advance purchase required!
Book your Chicago Food Tour today!
buy tickets at zerve
or call Zerve at (800) 979-3370

Friday, November 10, 2017

Slice and Dice: Butternut Squash

Butternut squash risotto
With Thanksgiving around the corner, it’s a fine time to start scouting out delectable side dishes. In our house, it’s sacrilegious to exclude mashed potatoes and stuffing from the menu. There’s less fervor associated with the other sides, and I like to use winter squash, in one of its many forms, to ensure that no one leaves hungry. After the holiday rush, I continue to use butternut squash and its thick-skinned brethren to add substance and, often a touch of sweetness, to salads, soup, and casseroles. Chances are prepping the versatile veggie is easier than you think.

How to Select and Store Butternut and Other Winter Squash

Winter squash varies widely in color, shape, and size. Nonetheless, always select squash that feels rock hard and seems heavy for its size. If possible, opt for squash that has its stem intact as it helps to preserve the vegetable's moisture. To maximize  shelf life, store butternut and other winter squash in a dark, dry, and cool spot such as a pantry.

How to Prep Butternut Squash

Thoroughly wash and dry the squash. Place it on its side on a cutting board. With a chef’s knife, cut half an inch off of either end of the squash.


Cut off top


Cut off bottom
Stand the squash with the wider cut end on the cutting board. Using a vegetable peeler, remove the skin.

Peel off skin

Slice the squash in half lengthwise.

Slice down the middle into two


Remove the seeds with a spoon. 

Remove the seeds with a spoon

To roughly chop, place one half of the squash on a cutting board with the cut side down. Slice it in half width wise.

Slice in half width wise
Place a quarter of the squash on a cutting board with the cut side down. Slice across the squash every inch or so lengthwise.

Slice across length wise

Carefully rotate the cut pieces 90 degrees and slice across the squash lengthwise every inch or so.

Repeat with the rest of the squash.


Advance purchase required!
Book your Chicago Food Tour today!
buy tickets at zerve
or call Zerve at (800) 979-3370

Monday, October 16, 2017

Slice and Dice: Eggplant

By early October, I start to crave comfort foods from around the world. Eggplants come in an endless variety - from Biancas to Santanas to Pingtung Long - and offer a ticket across the globe. I bake them until succulent in parmesan, roast them until smoky for baba ghanoush, and saute them for the perfect meat substitute in Asian dishes. 

How to Select and Store Eggplant

Although eggplant is available year-round, its peak season is during the late summer and early fall. When selecting the right one, be sure to check that the skin is smooth and taut. If it’s ripe, gently (and affectionately) squeezing the flesh will leave a shallow, temporary indentation.


How to Peel, Slice, and Salt Eggplant

In the U.S., the voluptuous pear-shaped globe eggplant is the easiest to find. Its purple-black skin becomes chewy when cooked, so it’s often removed. Its springy, porous flesh sucks in oil, so to keep it from becoming greasy when cooked, eggplant is often salted, rinsed, and dried before cooking.

Place the eggplant on its side on a cutting board. Slice of the stem and the rounded end.


Using a vegetable peeler or pairing knife, remove the skin in long strips, moving lengthwise from the stem to bottom end. Or leave it on and skip to the next step.

Slice across the eggplant crosswise.


Place slices in a colander and sprinkle generously with salt -- enough to ensure each slice has been dusted. This keeps it from becoming spongy when cooked. Let the eggplant sit with the salt for about 15 minutes. (You will see water beads appear on the eggplant's surface.)

Rinse the salt from the eggplant and thoroughly dry it before cooking.

How to Cube Eggplant


Place the eggplant on its side on a cutting board, slice off the ends, and remove the skin with a vegetable peeler, as above.
Rest the bottom end of the eggplant on the cutting board. Cut down through the eggplant lengthwise, every half inch, to create planks.


Stack two planks on the cutting board and slice across them lengthwise, creating half-inch wide sticks.


Cut across the sticks, every half inch, to create half-inch cubes.


Advance purchase required!
Book your Chicago Food Tour today!
buy tickets at zerve
or call Zerve at (800) 979-3370

Monday, October 9, 2017

Pumpkin White Chocolate Cookies

My Dad was a generous host who treated Halloween like a well-orchestrated dinner party. The candy he handed out had to meet a certain standard much like the imported cheese and crackers that he carefully assembled for dinner guests. In southern Illinois, mini candy bars were considered top of the line and a few weeks before Halloween, he and my Mom would drive to a wholesale store to buy them in bulk.  

My Dad would pile bags of the bars into a shopping cart to ensure that every witch, ghost, and goblin that rang the doorbell left with a generous handout. My Mom would tell him to cut back by a bag or two knowing that he cushioned the count to accommodate his sweet tooth. But my Dad would insist that they also take part in the celebration.


On Halloween, my Dad would leave his medical practice early to ensure that the yard was presentable. He brought out the blower to clear leaves from the driveway and the front walk. Afterwards, he would put on a well-pressed shirt, pair of slacks, and a sweater vest to guard against the cold each time he popped open the screen door. Before my parents sat down for an early dinner, my Dad would transfer the bars into wide-mouthed wicker baskets, making it easy to dole them out. He also loaded his camera with film to document the parade of costumed guests.


PUMPKIN WHITE CHOCOLATE COOKIES
 
INGREDIENTS

2 cups all-purpose flour
1 teaspoon baking soda
1 teaspoon salt
1/2 cup butter, softened
1/2 cup granulated sugar
1/2 light brown sugar
1 1/2 teaspoon vanilla extract
1 1/2 teaspoons cardamom
1 1/4 teaspoons cinnamon
1/2 teaspoon ground ginger
1/4 teaspoon cloves
3/4 cup pumpkin puree
1 large egg
3/4 cup chopped pecans
2 cups white chocolate, finely chopped

INSTRUCTIONS

Heat oven to 375 degrees.

In a medium bowl, whisk together the flour, baking soda, and salt.

Beat the butter, granulated sugar and brown sugar until well blended. 

Add the vanilla extract, cardamom, cinnamon, ground ginger, and cloves and beat until combined.
Add the pumpkin puree and egg. Beat until well combined.

Add half of the dry mixture and beat until the dry ingredients are just combined. Repeat with the remaining dry ingredients.

Gently fold in the pecans and white chocolate.
Drop teaspoons full of cookie dough two inches apart on a parchment lined cookie sheet.

Bake until edges brown, about 10 to 12 minutes.


Advance purchase required!
Book your Chicago Food Tour today!
buy tickets at zerve
or call Zerve at (800) 979-3370

Thursday, August 31, 2017

Slice and Dice: Beets

"The lesson of the beet, then, is this: hold on to your divine blush, your innate rosy magic..." Tom Robbins
 
 From the outside, beets fail to leave a lasting impression. In fact, they range from dull to downright curmudgeonly. Who wants that, when you can opt for cheery tomatoes or regally robbed eggplants? Well, as many cooks know, it’s foolish to judge a root vegetable by its cover. Despite their drab exterior, beets possess a beguilingly sweet, earthy flavor. They bring a jewel-like beauty to the table (think garnets and coral) and plenty of substance, including folate and fiber. 

How to Select and Store Beets

Select firm beets with wrinkle-free skin. If you find them with their greens intact, look for vibrant, succulent leaves, and consider yourself lucky: the antioxidant-rich greens are edible so you're getting two-for-one. Use them as a fiber-rich filler in soups, omelets, and stir-fries. 

Beets can be stored in the refrigerator loose and unwashed for up to a week. Cut off the greens first, leaving an inch of the stem intact to keep their stain-inducing juice from leaking into your fridge. Store the greens in a breathable bag in the fridge for up to two days.

How to Steam Beets

If the beet greens are attached, cut them with an inch of the stem still intact.


Thoroughly wash the beets. 

Fill a large pot with a few inches of water. Place the beets in a steamer insert in the pot and cover.

Simmer the beets until they are easily pierced with a knife, about 40 minutes to an hour for medium-sized beets. The skin may appear to pull away slightly. If needed, add more water during the cooking process.


Remove from the pot from the stove and allow the beets to cool.

Beet juice will stain your fingers. Put on a pair of plastic gloves to keep your hand from getting dyed.

Gently rub off the skin with your fingers.


How to Slice Beets

Slice off the stems and root end of cooked beets.

Place the beet on the cutting board root-side down. Slice across it every half inch or at larger intervals for thicker slices.


Wash your cutting board immediately as beet juice stains.

How to Dice Beets


Slice off the stem and root ends of cooked beets. Place the beet on the cutting board root-side down. Slice across the beet at every half inch.

Stack two beet slices on the cutting board. Cut across them widthwise at every half inch. Rotate the batons 90 degrees and slice across them lengthwise every half inch. 


Advance purchase required!
Book your Chicago Food Tour today!
buy tickets at zerve
or call Zerve at (800) 979-3370

Thursday, July 20, 2017

Caramelizing Onions

Before I met my husband, Chris, I tried my luck with online dating, which ran the gamut from dismaying to disastrous. Sound familiar anyone?

There was the guy who besmirched all Indians even though he knew my ethnic roots. During our shared meal, the waitress kept giving me “you outta ditch him” looks. Then there was the guy who unwittingly emailed me after dating my sister for several months. Guess he had a type.

There was also the guy with the seemingly promising profile (challenging job, close-knit family, big blue eyes) until I reached his list of likes/dislikes. He despised onions and didn't want them cooked in his house.

I know that relationships require compromise, but I eat onions every day. Could I really forgo the zing of red onions in salsa or three bean salad? Wouldn’t I miss the smoky undertow of yellow onions roasted with potatoes, carrots, or squash? And what about the silky, sweet touch of caramelized onions slathered on burgers, sandwiches, and pizza crust?

In the end, I decided giving up onions was too great a sacrifice and I kept looking for the one.

Did I mention that Chris loves onions? In fact, I have to ask him to dial back the mound he that mixes into guacamole and the hill that he layers onto salad. It leads to onion breath and occasional indigestion.

But that seems like a small sacrifice for Mr. Right. 

How to Caramelize Onions

Caramelizing onions is surprisingly simple. It involves cooking away the moisture hidden in each layer of an onion and browning the sugar that is left behind. The process requires patience more than anything else. Resist the temptation to speed things up by cooking the onions over high heat or adding sugar. (Chances are you’ll end up burning them.) Also opt for white, yellow, or red onions but not sweet as they become cloying when their flavors are concentrated.


To make about 1 to 1 1/2 cups of caramelized onions, thinly slice 2 large onions.


Thinly sliced onions


In a large skillet, heat 1 1/2 tablespoons of olive oil over medium heat.


Heat olive oil


Add the onions and stir to coat them with oil. Season the onions with salt and pepper. Stir the onions every 2 to 3 minutes until they begin to look glassy.

Lower the heat to medium low and increase the frequency of stirring from every few minutes to every minute as they become stickier, turn light brown, and begin to lose their shape. This will take 20 to 30 minutes, depending on your stove top. 


Stages of caramelization
If the onions stick to the bottom of the pan, add a splash of water and scrap them off. This technique is known as "deglazing." Only do this if the onions are sticking so much that you can't loosen them without water -- some sticking is good as it's the contact with the pan that helps to create the color. You can always add more water if necessary, but adding too much will delay the process as the onions will begin to steam.

Continue to cook the onions, stirring frequently, until they become golden brown.


Advance purchase required!
Book your Chicago Food Tour today!
buy tickets at zerve
or call Zerve at (800) 979-3370