Thursday, April 11, 2019

Prepping Shrimp

Shrimp over rice pilaf

Chicago is miles away from the ocean. And although I love its magnificent architecture and fun-loving folk, sometimes I long for the briny breath of the sea. On occasion, I travel to the coast or go abroad to reach its salty waters, but more often, I look for simple ways to bring its flavorful bounty into the kitchen.

I enjoy feasting on an array of seafood: crab, scallops, lobster, squid, or clams. But in the Windy City, shrimp is often the easiest to find. I love to sauté it with cayenne, black pepper, and chunks of coconut, but it’s just as easy to deep fry, boil, or barbecue the quick-cooking crustacean. During Lent, dishes like this Kerala Fried Shrimp make meatless meals a small sacrifice.  


How to Select Shrimp


When you smell raw shrimp, it should remind you of a stroll by the sea. If it hints of ammonia, it's spoiled - walk away. Look for shells that are clean, shiny, and free of spots. If possible, opt for whole shrimp, which has more flavor and spring texturally than its shelled and deveined counterpart. Whole shrimp is surprisingly easy to prep using the tips below.


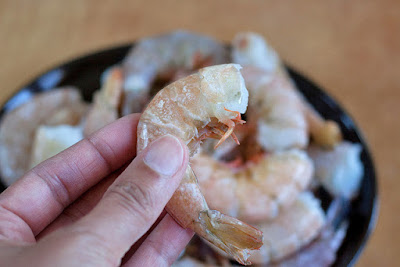
Whole shrimp with shell

How to Peel Shrimp


Shrimp is most often sold with the head removed. The translucent shell and, in most cases legs, are left intact. Although there are many ways to peel shrimp, I like to noodle my fingers just underneath the opening of the shell and carefully pull it away from the flesh as if I’m removing a tight-fitting life jacket.


Removing shrimp shell
I also run my finger under the tail shell and gently lift it off to keep the flesh just beneath intact.


Peeled and unpeeled shrimp

How to Devein Shrimp


A shrimp's intestine looks like a dark vein, which runs along its back. Since the intestine can have a gritty texture and an off-putting flavor, it’s best to remove it using a process called "deveining."Here's how you do it...Place the shrimp on a cutting board with the tail closest to you. With a paring knife, make a shallow slit along the curve of the shrimp’s stomach.

Slit the back of the shrimp with a pairing knife
Pull out the intestine with the tip of the knife and discard. 

Carefully remove the vein from the shrimp


How to Butterfly Shrimp


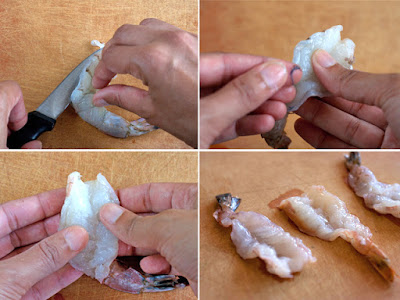
Place the peeled shrimp (with the tail shell intact) on a cutting board with the tail closest to you.
With a paring knife, make a deep cut along the curve of the shrimp’s stomach, nearly dividing it in two. 


4 steps to butterfly shrimp
Remove the intestine with your fingers or the tip of the knife. Gently pull the shrimp open so the flesh lays flat.

Advance purchase required!
Book your Chicago Food Tour today!
buy tickets at zerve
or call Zerve at (800) 979-3370

Saturday, February 9, 2019

Making Roux


Calgon, take me away... to a sun-drenched island so I can ditch my down-laden, puffy coat.

Anyone else with me?

Sadly, I know I won't be trading in my laptop for a beach towel any time soon. So, I've turned to my kitchen to counter my winter blues and pulled out the ingredients I need for roux. 

Roux is a simple thickener that's integral to French cuisine and underpins many classic soups and sauces. It's the base for tuna casserole, mac and cheese, and other traditional American casseroles. Darker shades of roux (including brown and chocolate), bring depth and flavor to gumbo, étouffée, and other Creole and Cajun classics. Yum. Let's say it together, "Fat Tuesday!" 

It's easy to prepare, requiring just a saucepan and whisk. The general rule is to start with equal parts flour to fat, but the proportions can vary. French recipes for roux commonly call for clarified butter, while Cajun or Creole recipes incorporate butter, oil, or lard. Dark shades of roux, which are cooked the longest, contribute the strongest flavors to a dish. 

How to Make Roux

Note: I’m using butter and flour to prepare a blond roux for mac and cheese. You can cook the roux for more or less time, depending on the dish.

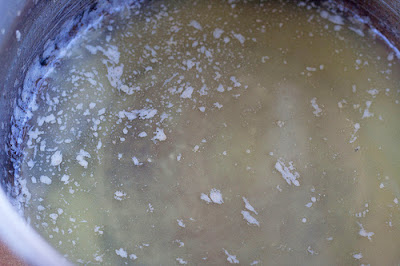
Melt the butter in a saucepan over medium heat.

Butter melted in a pot
Add a smidgen of flour to the butter.


Add flour to the melted butter
When the mixture begins to froth around the edges, add the rest of the flour. Whisk the ingredients together to form a paste.

Whisk together butter and flour
To produce a white roux, continue to whisk until the paste thins and the yellow hue from the butter disappears. The paste should look pale. This will only take a few minutes.

To produce a blond (or golden) roux, continue to whisk over medium heat until the flour begins to caramelize and the roux turns tan.


Continue to whisk butter and flour

To produce a brown roux, continue to whisk over medium heat until it takes on the color of peanut butter.


Cook until roux looks like peanut butter
Continue cooking beyond that, and you're in dark-roux territory, with dark brown roux ("red roux") next up, and even darker "chocolate" roux last in line.
Advance purchase required!
Book your Chicago Food Tour today!
buy tickets at zerve
or call Zerve at (800) 979-3370

Tuesday, January 15, 2019

How to Roast Garlic in the Oven

Oven roasted garlic in a brown bowl
"The are many miracles in the world to be celebrated and, for me, garlic is the most deserving." Leo Buscaglia

I adore onions and covet ginger, but nothing makes me swoon like the sonnet-worthy flavor of garlic. How do I love garlic? Please, allow me to count the ways...I love it raw with a pungent presence and crisp bite. I love it sauteed so it's mellowed, but still spunky. I love it roasted until it becomes sweet and savory and as spreadable as jam. 

When the ground is blanketed with snow, I recommend roasting garlic. The tender cloves provides a lingering warmth and the cooking process will infuse your kitchen with an aroma that comforts like a cozy, woolen blanket. 

Fire-breathe-free roast garlic is also the best option for date night (as are caramelized onions). You want to woo your spouse/partner/potential lover not cause him/her to run away. Far away, right? As garlic lovers know, "A nickel will get you on the subway, but (fresh) garlic will get you a seat."

Roasting  garlic in the oven couldn't be simpler. So if you're looking for a way to warm your heart and your house this fall, I'm here to lead the way...

How to Roast Garlic in the Oven
 

Preheat the oven to 400 degrees. Line an ovenproof dish with enough foil that it hangs over the sides. (When the time comes, you'll be able to seal the garlic in a tent). 

Garlic cloves with loose skin removed
Peel away any loose skin from the bulbs. 

Hold each bulb on its side and slice 1/4 to 1/2 inch off the top so the tip of each clove is trimmed. 

Place the bulbs in the foil-lined dish with their cut side facing up. 

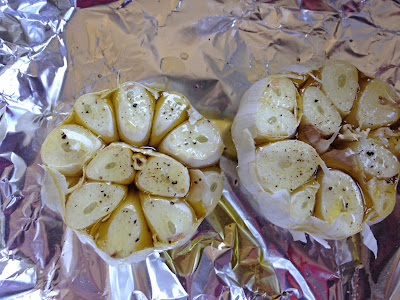
Trimmed garlic bulbs coated with olive olive and seasoned with salt and peppe
Coat the trimmed cloves with olive oil to keep the garlic from burning. Season with salt and pepper.

Gather the ends of the foil and fold them together to seal in the bulbs.

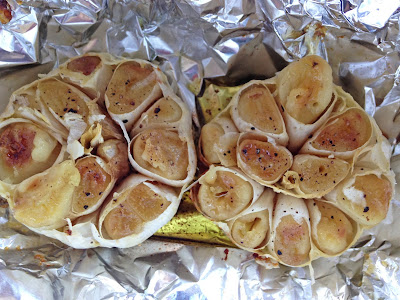
Cook until the garlic becomes tender, about 45 minutes for medium-sized bulbs. 

Two bulbs of oven-roasted garlic
Remove from oven and allow to cool completely. 

Gently peel away the outer skin. Squeeze the skin of each clove from the bottom (like a tube of toothpaste) to push out the flesh. 

How to Store Oven-Roasted Garlic


Place the cloves in an airtight container. Pour in enough olive oil to cover the cloves completely. Store in the refrigerator for up to a week. 

20 Ways to Use Roasted Garlic

Are you wondering how to use roasted garlic? Friends, the possibilities are endless. Here are 20 suggestions to get your culinary juices flowing:
  • Bake it into bread (like seen above)
  • Stir it into savory oatmeal
  • Spread it on warm toast
  • Substitute it for mayonnaise on sandwiches
  • Plop it on baked potatoes
  • Layer it on breakfast biscuits
  • Puree it into hummus
  • Beat it with butter 
  • Whip it with cream cheese
  • Smear it on crackers
  • Add it to salad dressing
  • Mix it into veggie dip
  • Puree it with tomato soup
  • Dollop it onto chili
  • Spread in on pizza dough
  • Add it to mac and cheese
  • Stir it into soup
  • Spread it on soft taco shells
  • Blend into a green smoothie
  • Mix it with warm pasta

Advance purchase required!
Book your Chicago Food Tour today!
buy tickets at zerve
or call Zerve at (800) 979-3370