Thursday, April 11, 2019

Prepping Shrimp

Shrimp over rice pilaf

Chicago is miles away from the ocean. And although I love its magnificent architecture and fun-loving folk, sometimes I long for the briny breath of the sea. On occasion, I travel to the coast or go abroad to reach its salty waters, but more often, I look for simple ways to bring its flavorful bounty into the kitchen.

I enjoy feasting on an array of seafood: crab, scallops, lobster, squid, or clams. But in the Windy City, shrimp is often the easiest to find. I love to sauté it with cayenne, black pepper, and chunks of coconut, but it’s just as easy to deep fry, boil, or barbecue the quick-cooking crustacean. During Lent, dishes like this Kerala Fried Shrimp make meatless meals a small sacrifice.  


How to Select Shrimp


When you smell raw shrimp, it should remind you of a stroll by the sea. If it hints of ammonia, it's spoiled - walk away. Look for shells that are clean, shiny, and free of spots. If possible, opt for whole shrimp, which has more flavor and spring texturally than its shelled and deveined counterpart. Whole shrimp is surprisingly easy to prep using the tips below.


Whole shrimp with shell

How to Peel Shrimp


Shrimp is most often sold with the head removed. The translucent shell and, in most cases legs, are left intact. Although there are many ways to peel shrimp, I like to noodle my fingers just underneath the opening of the shell and carefully pull it away from the flesh as if I’m removing a tight-fitting life jacket.


Removing shrimp shell
I also run my finger under the tail shell and gently lift it off to keep the flesh just beneath intact.


Peeled and unpeeled shrimp

How to Devein Shrimp


A shrimp's intestine looks like a dark vein, which runs along its back. Since the intestine can have a gritty texture and an off-putting flavor, it’s best to remove it using a process called "deveining."Here's how you do it...Place the shrimp on a cutting board with the tail closest to you. With a paring knife, make a shallow slit along the curve of the shrimp’s stomach.

Slit the back of the shrimp with a pairing knife
Pull out the intestine with the tip of the knife and discard. 

Carefully remove the vein from the shrimp


How to Butterfly Shrimp


Place the peeled shrimp (with the tail shell intact) on a cutting board with the tail closest to you.
With a paring knife, make a deep cut along the curve of the shrimp’s stomach, nearly dividing it in two. 


4 steps to butterfly shrimp
Remove the intestine with your fingers or the tip of the knife. Gently pull the shrimp open so the flesh lays flat.

Advance purchase required!
Book your Chicago Food Tour today!
buy tickets at zerve
or call Zerve at (800) 979-3370

Saturday, February 9, 2019

Making Roux


Calgon, take me away... to a sun-drenched island so I can ditch my down-laden, puffy coat.

Anyone else with me?

Sadly, I know I won't be trading in my laptop for a beach towel any time soon. So, I've turned to my kitchen to counter my winter blues and pulled out the ingredients I need for roux. 

Roux is a simple thickener that's integral to French cuisine and underpins many classic soups and sauces. It's the base for tuna casserole, mac and cheese, and other traditional American casseroles. Darker shades of roux (including brown and chocolate), bring depth and flavor to gumbo, étouffée, and other Creole and Cajun classics. Yum. Let's say it together, "Fat Tuesday!" 

It's easy to prepare, requiring just a saucepan and whisk. The general rule is to start with equal parts flour to fat, but the proportions can vary. French recipes for roux commonly call for clarified butter, while Cajun or Creole recipes incorporate butter, oil, or lard. Dark shades of roux, which are cooked the longest, contribute the strongest flavors to a dish. 

How to Make Roux

Note: I’m using butter and flour to prepare a blond roux for mac and cheese. You can cook the roux for more or less time, depending on the dish.

Melt the butter in a saucepan over medium heat.

Butter melted in a pot
Add a smidgen of flour to the butter.


Add flour to the melted butter
When the mixture begins to froth around the edges, add the rest of the flour. Whisk the ingredients together to form a paste.

Whisk together butter and flour
To produce a white roux, continue to whisk until the paste thins and the yellow hue from the butter disappears. The paste should look pale. This will only take a few minutes.

To produce a blond (or golden) roux, continue to whisk over medium heat until the flour begins to caramelize and the roux turns tan.


Continue to whisk butter and flour

To produce a brown roux, continue to whisk over medium heat until it takes on the color of peanut butter.


Cook until roux looks like peanut butter
Continue cooking beyond that, and you're in dark-roux territory, with dark brown roux ("red roux") next up, and even darker "chocolate" roux last in line.
Advance purchase required!
Book your Chicago Food Tour today!
buy tickets at zerve
or call Zerve at (800) 979-3370

Tuesday, January 15, 2019

How to Roast Garlic in the Oven

Oven roasted garlic in a brown bowl
"The are many miracles in the world to be celebrated and, for me, garlic is the most deserving." Leo Buscaglia

I adore onions and covet ginger, but nothing makes me swoon like the sonnet-worthy flavor of garlic. How do I love garlic? Please, allow me to count the ways...I love it raw with a pungent presence and crisp bite. I love it sauteed so it's mellowed, but still spunky. I love it roasted until it becomes sweet and savory and as spreadable as jam. 

When the ground is blanketed with snow, I recommend roasting garlic. The tender cloves provides a lingering warmth and the cooking process will infuse your kitchen with an aroma that comforts like a cozy, woolen blanket. 

Fire-breathe-free roast garlic is also the best option for date night (as are caramelized onions). You want to woo your spouse/partner/potential lover not cause him/her to run away. Far away, right? As garlic lovers know, "A nickel will get you on the subway, but (fresh) garlic will get you a seat."

Roasting  garlic in the oven couldn't be simpler. So if you're looking for a way to warm your heart and your house this fall, I'm here to lead the way...

How to Roast Garlic in the Oven
 

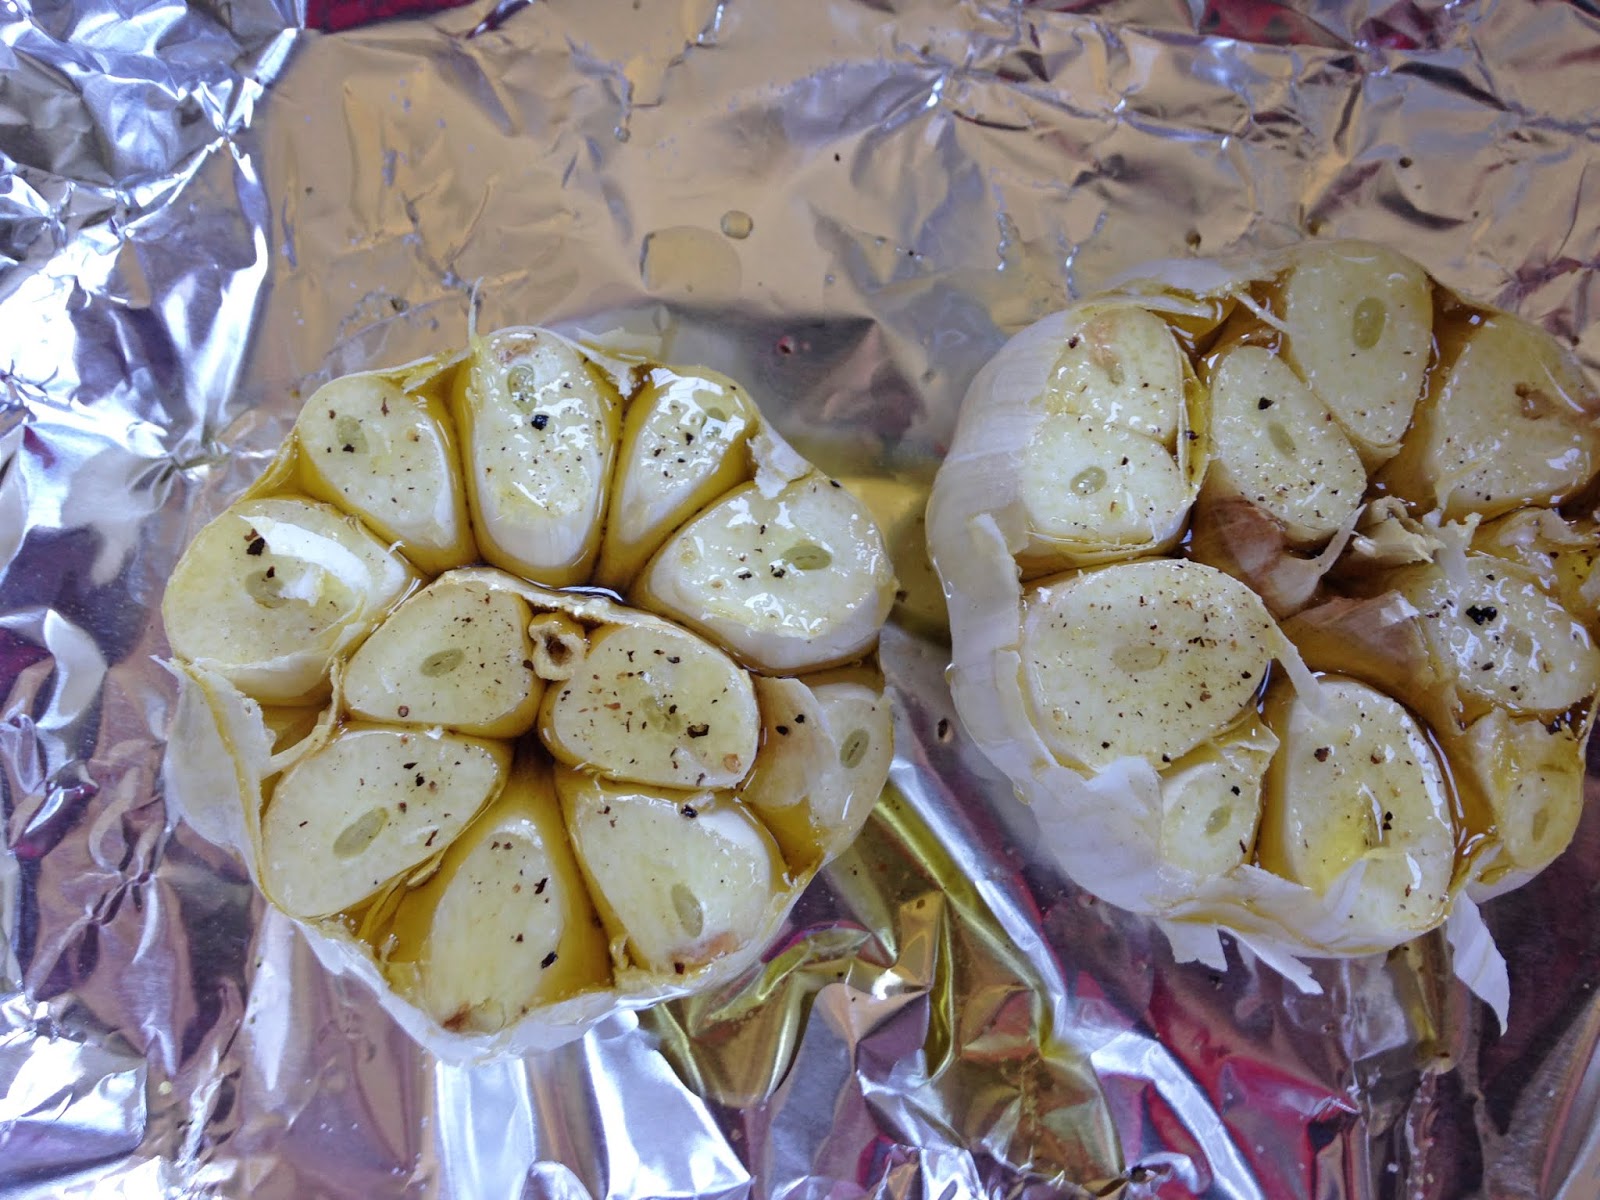
Preheat the oven to 400 degrees. Line an ovenproof dish with enough foil that it hangs over the sides. (When the time comes, you'll be able to seal the garlic in a tent). 

Garlic cloves with loose skin removed
Peel away any loose skin from the bulbs. 

Hold each bulb on its side and slice 1/4 to 1/2 inch off the top so the tip of each clove is trimmed. 

Place the bulbs in the foil-lined dish with their cut side facing up. 

Trimmed garlic bulbs coated with olive olive and seasoned with salt and peppe
Coat the trimmed cloves with olive oil to keep the garlic from burning. Season with salt and pepper.

Gather the ends of the foil and fold them together to seal in the bulbs.

Cook until the garlic becomes tender, about 45 minutes for medium-sized bulbs. 

Two bulbs of oven-roasted garlic
Remove from oven and allow to cool completely. 

Gently peel away the outer skin. Squeeze the skin of each clove from the bottom (like a tube of toothpaste) to push out the flesh. 

How to Store Oven-Roasted Garlic


Place the cloves in an airtight container. Pour in enough olive oil to cover the cloves completely. Store in the refrigerator for up to a week. 

20 Ways to Use Roasted Garlic

Are you wondering how to use roasted garlic? Friends, the possibilities are endless. Here are 20 suggestions to get your culinary juices flowing:
  • Bake it into bread (like seen above)
  • Stir it into savory oatmeal
  • Spread it on warm toast
  • Substitute it for mayonnaise on sandwiches
  • Plop it on baked potatoes
  • Layer it on breakfast biscuits
  • Puree it into hummus
  • Beat it with butter 
  • Whip it with cream cheese
  • Smear it on crackers
  • Add it to salad dressing
  • Mix it into veggie dip
  • Puree it with tomato soup
  • Dollop it onto chili
  • Spread in on pizza dough
  • Add it to mac and cheese
  • Stir it into soup
  • Spread it on soft taco shells
  • Blend into a green smoothie
  • Mix it with warm pasta

Advance purchase required!
Book your Chicago Food Tour today!
buy tickets at zerve
or call Zerve at (800) 979-3370

Thursday, September 20, 2018

Spiced Yogurt (Morum Vellam)

Ingredients2_edited-1

When we traveled to India as a family, we landed in Cochin during the summer monsoon season. Torrential rains soaked the ground, and although black umbrellas were pulled out to protect us, our chappals were often engulfed in a wave of water. At night, lightening blazed across the sky as if competing with the candles that were lit when the electricity went out. Thunder erupted with the force of what felt like 1,000 tons of TNT, occasionally jolting me out of sleep.

Crush ginger and onions

The heavy rains were accompanied by highs of 90 degrees and oppressive humidity. At the time, no one had air-conditioning, and the muggy air, which moistened the back of my neck and lower back, was circulated around the room by high-powered ceiling fans.
 Add curry leaves_edited-1
No matter where we went, piping hot tea was offered to ward off the heavy-handed heat. It was combined with whole milk and a very generous quantity of sugar. Sari shops and jewelry stores handed it out in a ceramic mugs mid-way through a sale. Snack vendors poured the scalding drink from one steel cup to another to produce a froth before serving it to customers who they had beckoned with their rhythmic call. "Chai, chai, chai, chai!!!”
 

Stir ingredients

At some point, I’d start to complain about having to drink so much tea as it never seemed to quench my thirst and, worse yet, forced me to frequent the bathroom. In response, my parents would buy me a bottle of Thums Up or Campa Cola from a snack stand en route to a relative’s house. They would also stop the car for tender coconuts that had been harvested and scalped with a sharp machete for their fresh, rejuvenating water. Afterwards, my parents would eagerly scoop out the tender flesh, which giggled like a soft boiled egg. At the time, I thought they were crazy.

Strain

When I complained to my aunts about having to drink so much tea, they would make me a glass of sweetened lime juice or morum vellam (spiced yogurt). Both drinks were perfect for battling Kerala’s tropical heat. 

Morum vellam

SPICED BUTTERMILK (MORUM VELLAM)

Serves 2 to 4

Morum Vellam is a comforting drink any time of year. If you’re sensitive to heat, I suggest removing the seeds and ribs from the serrano pepper before adding it in.

INGREDIENTS

1 cup organic low-fat yogurt
2 cups water
10 curry leaves
1/4 cup finely chopped shallot or red onion
1 tablespoon roughly chopped ginger
1 small serrano pepper, sliced lengthwise - hot
3/4 teaspoon salt

INSTRUCTIONS


Crush the onions and ginger using a mortar and pestle.

Put the yogurt and water in a blender. Blend them together until fully incorporated. Pour into a pitcher. 

Add the curry leaves, ginger, pepper, and salt. Stir together. 

Chill for 4 to 6 hours. 

Strain liquid to remove curry leaves, ginger, and pepper.
Advance purchase required!
Book your Chicago Food Tour today!
buy tickets at zerve
or call Zerve at (800) 979-3370

Saturday, August 4, 2018

Slice and Dice: Summer Melon

Watermelon and canteloupe with prosciutto

Melons are the underdogs of summer. Bulky and thick-skinned, their beauty lies within (making them easy to ignore). However, on a hot day when there’s sweat suspended on your brow, melons provide more relief than a pretty peach or a palmful of berries. Nearly 90 percent water, a wedge of watermelon or spoonful of cantaloupe often offers more nuance and refreshment than a fancy poolside drink. So, if you didn't get a beach vacation this summer, don’t fret. Pull out a lawn chair and slice up a melon.   

How to Select a Summer Melon

Although there are many varieties of melon grown in the U.S., cantaloupe and watermelon are often the easiest to find. The fruit that is sold as cantaloupe is often really muskmelon. Unlike true cantaloupe, muskmelon has deeply netted skin that resembles a curvy Celtic pattern. Look for a muskmelon that feels solid, but is not rock hard. Beware: If the skin has a greenish tone, it’s not fully ripe. Always give the fruit a whiff. If it’s ready to eat, you’ll breathe in a sweet perfume.

Ripe watermelon should feel heavy for its size. In addition, look for a patch of light yellow skin on the side that was resting on the ground.
  

How to Peel a Summer Melon

Muskmelon, cantaloupe, honeydew, and other sweet summer melons can be peeled.

Melons grow on the ground, so be sure to wash them thoroughly.

Place the melon on a cutting board on its side. Hold it in place with one hand. In the other hand, hold a chef’s knife perpendicular to the cutting board and slice off the stem end and the end opposite to it.

Slicing off one end of the canteloupe


Slicing the skin of the melon in thick strips

When the knife hits the cutting board, discard the strip of skin. Rotate the fruit, and continue peeling the skin until all of it is removed.

How to Slice a Summer Melon

Cut the skinned melon in half lengthwise. 

Scoop out the seeds with a spoon. 

Hold one half of the melon on the cutting board with the seeded side facing up. With a chef’s knife, slice it in half lengthwise. 

Continue to slice each melon quarter lengthwise until each piece is an inch or so thick. 

Slicing in half, seeding, and cutting the melon in wedges

How to Cube a Summer Melon

Place a slice of the melon on a cutting board. Hold the end of the slice securely with one hand, and cut across the length of the melon with a chef's knife to form cubes.

Cutting the melon in cubes

How to Cut a Small Watermelon into Wedges

Note: Watermelon has much thicker skin (often referred to as a rind) than other summer melons. Be sure to use a sharp knife when cutting it. You can also stabilize it by placing a damp kitchen towel between it and the cutting board before making the first cut.

Select a small watermelon and place it on a cutting board with the stem side down. With a chef's knife, cut it in half lengthwise. With the cut side facing up, cut each half of the melon in half lengthwise. Take each quartered piece and slice it in half lengthwise again.

Cutting the watermelon in half and then in quarters

How to Cut a Large Watermelon into Wedges

Place a large watermelon on a cutting board with the stem side down and cut it in half lengthwise. With the cut sides facing down, cut each half in half lengthwise again to make quarters. Place one quarter of the melon on the cutting board, with the rind facing you and one of the cut sides facing down. Cut it widthwise into 1-inch thick triangular slices. Repeat with remaining quarters.

Cutting the watermelon in half and quarters and then into wedges

To cube the watermelon, simply place a slice on the cutting board with one side of the flesh touching the board. With a paring knife, cut the rind away from the flesh. 

Cutting the watermelon along the rind

With a chef’s knife, cut across the fruit.

Cutting across the watermelon wedge

Rotate the fruit 90 degree and cut across it again to form cubes. 

Cutting the melon to form cubes

How to Make Melon Balls

Press the melon baller into the fruit, avoiding the rind. Rotate it 360 degrees to form a circle, and then drop the melon ball into a bowl. Repeat until no more balls can be taken from the melon, leaving space between each scoop to ensure melon balls are completely round and cutting the melon down to a smaller size from time to time to reveal untouched flesh.

Using a melon baller to form spheres


Advance purchase required!
Book your Chicago Food Tour today!
buy tickets at zerve
or call Zerve at (800) 979-3370

Friday, July 6, 2018

Slice and Dice: Chili Peppers

Bowl of beef and rice with fresh chili peppers

My mom is a sorcerer in the kitchen. She uses spices like potions, never measuring anything out. A pinch of  turmeric goes here. A palm full of  coriander goes there. Then she tosses in a little bit of cardamom. Thanks to her culinary prowess, we sit down to an enchanting array of dishes - Beef Cutlets, Chicken Biryani, Mung Bean Pudding - that seem to have magically appeared. 

When I started recreating my mom's recipes, I was surprised to find that there was one ingredient I could never leave out: chili peppers. They add spunk to curries, stir-fries, and casseroles, but more importantly they bring out the flavor of other ingredients, like a good team player. Any time I excluded them, a dish would fall flat. If you're sensitive to heat, use the tips below to dial it back. Affordable and available year-round, I suggest you keep a steady supply in the kitchen. 

How to Select

Chili peppers continue to ripen after they are harvested and many become hotter as they mature. Their color also deepens or changes. Jalapeños, for example, go from green to red as they age. If you’re looking for maximum heat, select darker chili peppers from the bunch. Taut, shiny skin is a sign of freshness. Avoid soft, wrinkled chili peppers that look like they could use a boost of Botox.

How to Remove the Seeds and Inner Tissue

Chili peppers get their kick from capsaicin, a chemical concentrated in the spongy inner tissue and seeds. Since capsaicin has an irritating affect, avoid touching any part of your face (especially your eyes) when prepping chili peppers. If you have sensitive skin, be sure to wear gloves. During clean-up, carefully wash your hands and kitchen equipment with soapy water to cleanse away any capsaicin that may  linger behind.

Chili peppers can be prepped with the capsaicin-laden tissues and seeds intact. If you want to dial down the heat, use these simple steps to remove them:


Thoroughly wash and dry the chili pepper. Lay it on its side on a cutting board and use a chef’s knife to slice off the stem end. 


Slice off top of chili pepper
Slice the chili pepper in half lengthwise.

Slice chili pepper in half length wise
Chili pepper sliced in half
Place one half of the chili pepper on the cutting board with the cut side facing up. Slide the tip of the knife under the tissue and carefully cut it away from the inner wall of the chili pepper without cutting through the flesh.

Remove ribs and seeds from chili peppers
Use your fingers or the tip of the knife to scrape out the seeds.

Chili peppers with ribs and seeds removed
How to Chop

Lay one half of the trimmed, deseeded chili pepper on a cutting board skin side down. Cut it in thick slices lengthwise.

Slice chili peppers into quarters
Rotate the slices 90 degrees and cut across them widthwise.

Slice chili peppers into chunks
How to Julienne

Lay one half of the trimmed, deseeded chili pepper on a cutting board skin side down. Cut it in thin slices lengthwise.

Chili peppers cut lengthwise into strips

How to Mince

Lay one half of the trimmed, deseeded chili pepper on a cutting board skin side down. Cut it in thin slices lengthwise In culinary school, this is called a julienne. 

Rotate the slices 90 degrees and cut across the slices widthwise.

Slice slivers of chili peppers


Advance purchase required!
Book your Chicago Food Tour today!
buy tickets at zerve
or call Zerve at (800) 979-3370

Tuesday, June 5, 2018

Slice and Dice: Jackfruit

Jackfruit tree, close up jackfruit, pile of fruit pods, jackfruit at Jewel
The last time I landed at Cochin International Airport, there was a taxi cab driver bandh or strike. My cousin Kunjumon miraculously managed to retrieve me with the help of a private driver. 

Soon after we arrived at his house, I stepped under a canopy of coconut trees towering in the backyard. The toasty air and lush green landscape provided the perfect counterpoint to the steely winter weather I'd left behind. 

Before I could take a breath, Kujumon ran out and accosted me.

"What are you doing out here? You could get hit by a coconut."

I thought he was teasing me as my Dad's side is full of pranksters. 

"Really you could get killed." Rats, he was serious. 

As it turns out, death by hard-shelled fruit is no joke in Kerala (a.k.a the land of coconuts). I learned that the only thing worse is getting pummeled by jackfruit, which can weigh over 100 pounds. 

Like turmeric and cardamom, jackfruit is a Kerala original. From the outside, it looks like a portly, prehistoric reptile. Picture an elephantine watermelon covered in a tapestry of poky, grasshopper green nubs. Carve open a ripe one, however, and they will come. It's gentle flavor falls somewhere between a banana and a perfectly ripened cantaloupe. It's texture has bite. No fruity mush here.  

In the U.S., fresh jackfruit used to be a rare find. Recognizing that dilemma, my cousin Sunil once lugged a sizable one from Miami to Cleveland to surprise his parents. He held it close at check in to manage the weight. A fellow passenger assumed it was a child and asked, "Can I see your baby?" No joke. 

Thanks to its growing popularity, fresh jackfruit has become increasingly available, cutting down on such awkward moments. In Chicago, precut wedges are often available along Devon Avenue. More surprisingly, it now pops up at mainstream grocery stores, including Jewel. 

Prepping ripe jackfruit is a multi-stepped labor of love. If you want to bring a fresh bowlful to the table, read on.

How to Select Jackfruit

Since the good stuff is inside, it's easiest to start with a precut wedge of jackfruit (just as you might with watermelon) and work your way to the tasty pods. If you go this route, look for a wedge that is pineapple yellow versus butter yellow for the fullest
 flavor. Warning: ripe jackfruit has a funky aroma, which may emanate through the wrapping. Don't let it scare you.

If you're beginning with a whole fruit, look for a yellow-green shell. Green-shelled jackfruit may be prettier, but the fruit will not be ripe. 


Wedges of jackfruit


How to Cut Jackfruit

Jackfruit contains ribs covered in a very stick resin. To begin, coat your hands, your chef's knife, and your cutting board with a thin layer of neutral oil to keep it from globing on. Soap and water will not do the trick. Trust me, you do not want to skip this step. 

Cut the fruit width wise to create a disk and make it easier to handle.


Slice the disk in half.
 
Slice away the fibrous core and cut into wedges.

Pull out the fleshy pods.

Pull open the pods like a clam shell and remove the seeds, which are also edible. (More on that later.)

Advance purchase required!
Book your Chicago Food Tour today!
buy tickets at zerve
or call Zerve at (800) 979-3370