“There's nothing better than cake but more cake.” Harry Truman
What is your favorite comfort food - the dish that makes your shoulders relax and your mouth water? For me, it's home-baked chocolate cake tucked under a supple layer of fudgy frosting. I've made many versions (including a double-decker, ganache-filled extravaganza topped with flowers sculpted from modeling chocolate for my sister's 40th birthday). When I show up for celebratory gatherings, family and friends assume I'll be toting cake.The most important thing I’ve learned over the years is that no one expects perfection. In fact, they rarely seem to notice (or care) if a cake tilts or frosting gets smudged. The intoxicating flavor of homemade icing and cake makes them feel loved. Use the tips below to spread that warm fuzzy feeling.
Basic Tools for Frosting Cakes
- A serrated knife: Many cakes
develop a domed top when baked, which should be removed before they are
frosted. A serrated knife, such as a bread knife, is the best tool for the
job as it easily slices through cake crumbs.
- Offset spatula: Although I try
my best to get by with basic kitchen equipment, I believe a small offset
is an essential tool for the avid baker. Use it to spread icing, custard,
and other fillings on cakes and pastries.
- Parchment paper
or wax paper:
You can use either of these products to keep trimmed cakes from spreading
crumbs.
How to Frost a Cake
Make sure that the cake has cooled completely or
your frosting will melt.
Place the first layer of cake on a sheet of parchment paper or wax paper. Hold the knife horizontally against the cake where it starts to dome and carefully slice across the top to create a flat surface. Repeat with the other layers.
Place the first layer of cake on a sheet of parchment paper or wax paper. Hold the knife horizontally against the cake where it starts to dome and carefully slice across the top to create a flat surface. Repeat with the other layers.
Place the first layer of cake on a plate or cake stand with the bottom facing up. This helps to ensure that the top is completely flat.
Tuck strips of parchment paper or wax paper
between the cake and the plate to catch crumbs and bits of frosting.
Gently remove any loose crumbs with your fingers
or a pastry brush.
Place a dollop of frosting on the center of the
cake.
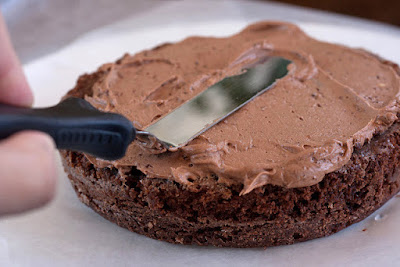
Using the offset spatula spread the frosting to
cover the top of the cake.
Place the second layer of cake on the first layer with the bottom
facing up. Again, dust away any loose crumbs.
Now it’s time to add the “crumb coat” which locks in any wayward crumbs. Place a scoop of frosting on the top layer of the cake.
Using the offset spatula, spread the frosting
from the center of the cake to the top edges.

Chill the cake for 30 minutes in the refrigerator (or for 15
minutes in the freezer).
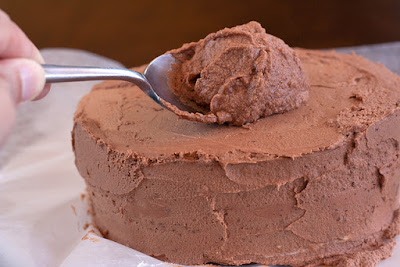
Remove the cake from the refrigerator. Place a generous scoop of frosting on top of the cake. Using the offset spatula spread the frosting across the top of the cake starting in the center.


